


Table of contents
- What is RepeatedTest in JUnit 5?
- What is the use of RepeatedTest ?
- How to use JUnit 5 @RepeatedTest annotation
- How to configure the custom test display name using @RepeatedTest annotation in JUnit 5
- Customized display names in JUnit 5
- How to use RepeatedTest: RepetitionInfo Interface in JUnit 5
- How to use RepeatedTest : RepeatedTest Interface in JUnit 5
- Conclusion
The JUnit framework is a popular test automation framework for unit testing in Java. The latest version of JUnit, i.e., JUnit 5 (also known as Jupiter), offers a number of improvements over JUnit 4. However, the community of JUnit users are often divided on this new release, with some favoring the stability of JUnit 4 and others preferring the new features being introduced with each release of JUnit 5. If you have been using JUnit 4, you can check the JUnit4 vs JUnit 5 comparison to understand the difference between them.
While JUnit 5 has introduced a lot of new and useful annotations, @RepeatedTest in JUnit 5 is one of the most powerful JUnit 5 annotations in the list. As an automation tester, we often get into a situation where we want to repeat a test case execution. If we have a flexible automation framework, we can pass such information through configuration in specific cases. Having said that, it is always good to have a feature that exclusively supports this requirement and can be instrumental while performing Selenium automation testing.

What is RepeatedTest in JUnit 5?
RepeatedTest, as the name suggests, is a test that is repeated during the test execution a certain no. of times. Let’s not confuse this with the parameterized test in JUnit. A parameterized test repeatedly executes with different input data, while a repeated test repeatedly executes with the same input data.
Are you looking for a Decimal to Gray Code covertor? It is a is a free online converter that converts any Decimal number base into gray code format.
What is the use of RepeatedTest ?
As a QA engineer, the first question that comes to mind is “Why do we need to repeat a test multiple times?”. First, there can be many scenarios where we need to do so. For example, a specific link on a web page results in an environment error, but this error disappears after two clicks. This is a known issue and you do not want your test case to fail for such a known issue.
Another scenario can be automating an application and clicking a link or navigating from one page to another. It always takes different load times, which sometimes results in timeout exceptions for the test case. In this case, we might want to execute the test case multiple times to get an average load time. And then pass that average load time as the threshold for the timeout.
Basically, most of the time, repetition is required when there is some randomness in the test case.
So, if you’re curious about the world of JUnit 5 annotations, this video will help you get started. You’ll learn JUnit 5 annotations in Selenium, how to write a JUnit test with Selenium, how to execute JUnit tests on a cloud Selenium Grid, and much more.
However, you can follow the LambdaTest YouTube Channel and stay updated with more such videos on the JUnit tutorial with Selenium.
How to use JUnit 5 @RepeatedTest annotation
JUnit Jupiter @RepeatedTest annotation is used to repeat the test case for specified no. of times. Each invocation of the test case behaves like a regular @Test method, so it has support for the same lifecycle callbacks and extensions in JUnit 5.
The following example declares myTest() to repeat execution five times:
    [@RepeatedTest](http://twitter.com/RepeatedTest)(5)
    void myTest() {
    // ...
    }
There are certain rules associated with the method @RepeatedTest in JUnit 5.
The @RepeatedTest in JUnit 5 can not be private and static.
The return type for @RepeatedTest in JUnit 5 must be void.
Let’s see how it is used in the test case with a basic example-
Test Case
Launch the URL- amazon.com
Click on the navigation menu item- “BestSellers.”
Validate that the page opened has the heading-“Amazon BestSellers.”
Repeat the same test case 5 times.
package Test;

    import java.net.MalformedURLException;
    import java.net.URL;

    import org.junit.After;
    import org.junit.Before;
    import org.junit.jupiter.api.AfterEach;
    import org.junit.jupiter.api.BeforeEach;
    import org.junit.jupiter.api.RepeatedTest;
    import org.openqa.selenium.By;
    import org.openqa.selenium.WebDriver;
    import org.openqa.selenium.chrome.ChromeDriver;
    import org.junit.jupiter.api.Test;
    import junit.framework.Assert;

    public class RepeatedTestDemo {
       public WebDriver driver = null;

    [@BeforeEach](http://twitter.com/BeforeEach)
       public void setup() throws Exception {
           System.setProperty("webdriver.chrome.driver",
                   "DRIVER_EXE_PATH");
           driver = new ChromeDriver();
       }

    [@RepeatedTest](http://twitter.com/RepeatedTest)(value = 5)
       public void repeatedTestDemo() throws Exception {
           try {

               driver.get("[https://www.amazon.in/](https://www.amazon.in/)");
               driver.findElement(By.xpath("//a[text()='Best Sellers']")).click();
               String actual = driver.findElement(By.xpath("//div[[@id](http://twitter.com/id)='zg_banner_text']/div[1]")).getText();
               Assert.assertEquals("Pass", "Amazon Bestsellers", actual);
           } catch (Exception e) {
               System.out.println(e.getMessage());
           }
       }

    [@AfterEach](http://twitter.com/AfterEach)
       public void tearDown() throws Exception {
           driver.quit(); // for illustration
       }

    }
Following is the output of the above code:
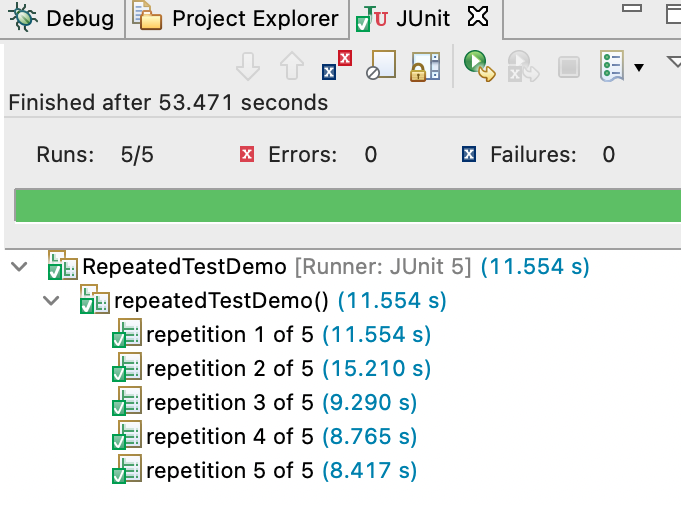
As we can see, by default, JUnit displays the repetition number along with the total number of repetitions. We can also modify the display name, which we will discuss later. For now, let us do a code walk-through.
As it is quite evident that @RepeatedTest in JUnit 5 is treated as @Test annotation by JUnit 5, the lifecycle is also the same. For example, @BeforeEach and @AfterEach methods will be invoked before and after each invocation of the @RepeatedTest method in JUnit 5.
Are you looking for a Decimal to BCD converter? In computing and electronic systems, a binary-coded decimal (BCD) is a method of representing each decimal digit by its binary sequence. The Decimal to BCD Converter converts an integer to a binary-coded decimal (BCD).
How to configure the custom test display name using @RepeatedTest annotation in JUnit 5
@RepeatedTest in JUnit 5 supports DisplayName placeholder to give a custom display name to the test. It returns the value provided in the annotation @DisplayName for the test method. If there is no @DisplayName annotation given, it returns the method name itself.
Syntax
@RepeatedTest(name={displayName})
The annotation supports two display name patterns.
SHORT_DISPLAY_NAME
LONG_DISPLAY_NAME
SHORT_DISPLAY_NAME is the default placeholder. When used, JUnit displays the following pattern-
repetition {currentRepetition} of {totalRepetitions}
LONG_DISPLAY_NAME when used, JUnit display the following pattern-
{displayName}:: repetition {currentRepetition} of {totalRepetitions}
Where the placeholders-
{currentRepetition}: is the current repetition count
{totalRepetitions}: is the total number of repetitions
Customized display names in JUnit 5
We can also provide a string value and the supported placeholders to make it more meaningful. Let’s modify the above code to demonstrate the custom display name.
package Test;
import java.net.MalformedURLException;
import java.net.URL;
import org.junit.jupiter.api.AfterEach;
import org.junit.jupiter.api.BeforeEach;
import org.junit.jupiter.api.DisplayName;
import org.junit.jupiter.api.RepeatedTest;
import org.openqa.selenium.By;
import org.openqa.selenium.WebDriver;
import org.openqa.selenium.chrome.ChromeDriver;
public class RepeatedTestDemo {
public WebDriver driver = null;
[@BeforeEach](http://twitter.com/BeforeEach)
public void setup() throws Exception {
System.setProperty("webdriver.chrome.driver",
"YOUR_DRIVER_EXE_PATH");
driver = new ChromeDriver();
}
[@DisplayName](http://twitter.com/DisplayName)("Link Verification")
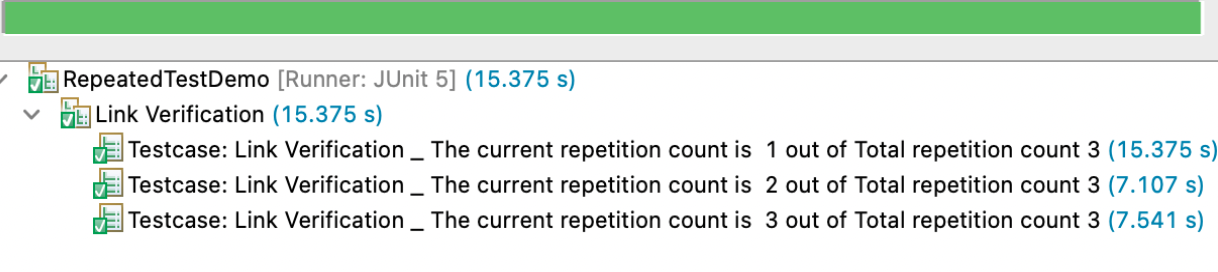
[@RepeatedTest](http://twitter.com/RepeatedTest)(value = 3, name = "Testcase: {displayName} _ The current repetition count is {currentRepetition} out of Total repetition count {totalRepetitions}")
public void repeatedTestDemo() throws Exception {
try {
driver.get("[https://www.amazon.in/](https://www.amazon.in/)");
driver.findElement(By.xpath("//a[text()='Best Sellers']")).click();
String actual = driver.findElement(By.xpath("//div[[@id](http://twitter.com/id)='zg_banner_text']/div[1]")).getText();
Assert.assertEquals("Pass", "Amazon Bestsellers", actual);
} catch (Exception e) {
System.out.println(e.getMessage());
}
}
[@AfterEach](http://twitter.com/AfterEach)
public void tearDown() throws Exception {
driver.quit(); // for illustration
}
}
In the above example, the displayName is passed as a parameter, and it would replace the value of @displayName annotation at the run time. Therefore, the output of the above code would be something as shown below:

This JUnit certification establishes testing standards for those who wish to advance their careers in Selenium automation testing with JUnit.
Here’s a short glimpse of the JUnit certification from LambdaTest:
How to use RepeatedTest: RepetitionInfo Interface in JUnit 5
RepetitionInfo interface defines methods to retrieve the information about the current repetition and the total no. of repetitions. Here’s how we can use it.
RepetitionInfo.getCurrentRepetition() returns current repetition.
RepetitionInfo.getTotalRepetitions() returns total no. of repetitions.
Here is A Definitive Guide To Regression Testing. Do Check it out.
How to use RepeatedTest : RepeatedTest Interface in JUnit 5
RepeatedTest interface defines methods to get attributes of the annotation @RepeatedTest of the test method. Here’s how we can use it-
RepeatedTest.name() returns the name value passed as a parameter in @RepeatedTest Annotation.
RepeatedTest.name() returns the name value passed as a parameter in @RepeatedTest Annotation.
However, the best way to harness the real potential of the JUnit framework for test automation is to shift it from a local Selenium Grid to a cloud-based Selenium Grid so that it can be executed in any browser anywhere in the world. When combined with LambdaTest, the JUnit framework allows developers to execute automated acceptance tests on a cloud Selenium Grid, which provides true remote testing capabilities.
LambdaTest is a cloud-based automated cross browser testing platform that allows you to easily run Selenium tests on more than 3,000 real browsers and operating systems in the cloud. You can run tests on any online browser or operating system with just one command, or create powerful suites that contain thousands of your own custom-built test steps.
Selenium-Jupiter allows you to run Selenium tests against a Grid of Remote Web Browsers (RWB) on different browser and platform combinations. LambdaTest helps you run parallel testing in Selenium with increased efficiency and speed, by making use of cloud-based automation.
Conclusion
In this Selenium JUnit 5 tutorial, we have covered the annotation @RepeatedTest in JUnit 5 along with its use case. As we discussed, the annotation is particularly useful when we want to ascertain a scenario. In addition, the advantage of having an exclusive functionality for such a case is wonderful. So, what’s your use case for this annotation? Let us discuss this in the comments.
Happy Testing!