


Table of contents
- Introduction to JUnit
- How to install JUnit
- How to create and execute test cases in JUnit
- How to run JUnit Test
- Introduction to TestNG
- How to install TestNG
- How To Create and Execute Test Cases in TestNG
- How to run TestNG test cases
- How To Run JUnit Tests using TestNG in Selenium
- Parallel Test Execution of JUnit Test Cases in TestNG Using Remote Selenium Grid
- Conclusion
Both JUnit and TestNG are popular unit testing frameworks that have been widely accepted by Java developers. JUnit was introduced as an open-source unit testing framework for Java way back in 1997. In fact, JUnit is one of the widely used test automation frameworks for test automation. TestNG is another Java-based test automation framework that is not only open-source but also offers awesome features that are best suited for large-scale web automation testing. TestNG was created for a range of testing categories, including (but not limited to) unit testing, functional testing, end-to-end testing, and integration testing.

Like me, if you are well-versed with both the test automation frameworks, you might come across scenarios where you would want to run JUnit tests using TestNG. The major push for this cross-pollination (to put it in simple terms) is the extensive set of features provided by the TestNG framework. TestNG supports broader categories of tests, making it easy for testers to migrate the JUnit test cases to the TestNG framework. The advantage of this approach is avoiding complete rewrite of the test scenarios that are using the JUnit framework.
In this blog, we look at how you can run test cases using JUnit and TestNG in Selenium without any re-work in writing the tests.
Hey! Test on Selenium Testing Grid Cloud of 3000+ Desktop & Mobile Browsers.
Introduction to JUnit
Java came up with its open-source unit testing framework called JUnit, following the practice of extreme programming. Though JUnit is primarily used for unit testing, automated testing with JUnit and Selenium can be extensively used for cross browser testing (or browser compatibility testing).
On the other hand, the TestNG (Test Next Generation) framework has advanced features that let you perform various categories of tests (i.e., unit testing, integration testing, functional testing, etc.).
How to install JUnit
The latest version of JUnit is JUnit 5. Unlike JUnit 4, JUnit 5 is composed of modules from three different projects — JUnit Platform, JUnit Jupiter, and JUnit Vintage.
JUnit Platform — Provides the base for launching testing frameworks
JUnit Jupiter — Provides a TestEngine for running Jupiter-based tests on the platform
JUnit Vintage — Provides a test engine for running Unit 3 and JUnit 4 tests
In case you are using JUnit 4 tests and intrigued to know about running with the JUnit 5 framework, do have a look at our blog that helps you execute JUnit 4 tests with JUnit 5 framework.
To get started with the JUnit framework, follow the below-mentioned steps:
To install JUnit in your project, navigate to the JUnit 5 website → Docs → User Guide and download the dependencies.
To use JUnit, include the jar files in your project ClassPath.
To use JUnit in Eclipse, include JUnit libraries in your Java project. For example, Right-click on the Java project → Properties → Java Build Path → Add Libraries → Select JUnit → Choose library version (JUnit 4/JUnit5).
You can check our getting started with JUnit blog to take the first steps in using the framework for Selenium test automation.
How to create and execute test cases in JUnit
JUnit provides a handful of annotations to create and execute test cases. Therefore, it is important to have a good understanding of JUnit Annotations in Selenium if you are using the framework for Selenium automation testing.
Now that we have covered the essentials of JUnit, let’s get our hands dirty with a JUnit test example that demonstrates Selenium test automation:
Test Scenario
Navigate to todomvc.com/examples/react/#
Enter the text “JUnit Parallel Test sample” in the textbox
Validate that the exact text appears in the list below the textbox
Implementation
To implement the above test case, we will write JUnitDemo test class:
package Test;
    import org.openqa.selenium.By;
    import org.openqa.selenium.Keys;
    import org.openqa.selenium.WebDriver;
    import org.openqa.selenium.chrome.ChromeDriver;
    import org.junit.After;
    import org.junit.Assert;
    import org.junit.Before;
    import org.junit.Test;

    public class JUnitDemo {
       WebDriver driver;

       @Before
       public void setUp() throws Exception {
           System.setProperty("webdriver.chrome.driver", "YOUR DRIVER EXE PATH");
           driver = new ChromeDriver();

       }

       @Test
       public void testJunitDemo() throws Exception {
           try { // Change it to production page
               int total_elements = 0;
               driver.get("https://todomvc.com/examples/react/#/");
               driver.findElement(By.className("new-todo")).sendKeys("JUnit Test sample");
               driver.findElement(By.className("new-todo")).sendKeys(Keys.ENTER);
               total_elements = driver.findElements(By.xpath("//ul[@class='todo-list']/li//label")).size();
               Assert.assertEquals(1, total_elements);

           } catch (Exception e) {
               System.out.println(e.getMessage());
           }
       }

       @After
       public void tearDown() throws Exception {
           driver.quit();
       }

    }
Code Walkthrough
@Before and @After annotations specify that the method code will be executed before and after each test method. An assert is not raised if the expected result matches the actual result.
The test method testJUnitDemo contains the Selenium script to perform the test steps. If you are using the JUnit framework, you should leverage parameterized testing with JUnit to make the most out of Selenium and JUnit as a complete package!
How to run JUnit Test
1- To run the above code in Eclipse, right-click on the test class and select Run As → JUnit Test.
2- To run the test case outside Eclipse, you can create a TestRunner class.
3- You can include more than one test using runClasses testclass1,[testclass2,…].
    import org.junit.runner.JUnitCore;
    import org.junit.runner.Result;
    import org.junit.runner.notification.Failure;
    public class TestRunner {
      public static void main(String[] args) {
         Result result = JUnitCore.runClasses(JUnitDemo.class);
         for (Failure failure : result.getFailures()) {
            System.out.println(failure.toString());
         }
         System.out.println(result.wasSuccessful());
      }
    }
4- To run in the command line, follow the syntax-
$ java org.junit.runner.JUnitCore TestClass1 [TestClass2 ...]
You can refer to our detailed JUnit Tutorial on the LambdaTest learning hub to gain insights into the other offerings of the JUnit framework.
Watch this video to learn how TestNG has become one of the most robust test automation frameworks and all you need to know to get started with TestNG in Selenium.
Introduction to TestNG
TestNG is also a very prevalent Java testing framework that is widely used by the developer and tester community. The framework is extensively used for test creation with an immense focus on features such as grouping, dependency, prioritization, annotations, and more. At the time of writing this blog, the latest version of TestNG is version 7.3.0.
With TestNG certification, you can challenge your skills in performing automated testing with TestNG and take your career to the next level.
Here’s a short glimpse of the TestNG certification from LambdaTest:
Automate Cypress testing and perform browser automation testing with LambdaTest Now!
How to install TestNG
Head over to the official website of TestNG and copy the dependencies (Maven/Gradle) to your project. In case you are using the Eclipse IDE, you can refer to our comprehensive guide on how to install TestNG in Eclipse.
Once you have installed Eclipse on your system, you have to create a project and download the corresponding dependencies. You can check out our blog to help you create a TestNG project In Eclipse for Selenium test automation.
How To Create and Execute Test Cases in TestNG
To demonstrate the usage of the TestNG framework for web automation testing, we use the same test scenario that we had demonstrated in the earlier section. The browser and platform combination also remains unchanged.
Test Scenario
Navigate to todomvc.com/examples/react/#.
Enter the text “TestNG Sample Test” in the textbox.
Validate that the exact text appears in the list below the textbox.
Implementation
  package Test;

    import static org.testng.Assert.assertTrue;

    import java.net.MalformedURLException;
    import java.net.URL;

    import org.junit.Assert;
    import org.openqa.selenium.By;
    import org.openqa.selenium.Keys;
    import org.openqa.selenium.WebDriver;
    import org.openqa.selenium.chrome.ChromeDriver;
    import org.testng.annotations.AfterClass;
    import org.testng.annotations.AfterMethod;
    import org.testng.annotations.BeforeClass;
    import org.testng.annotations.BeforeMethod;
    import org.testng.annotations.Test;

    public class TestNGDemo {
       public WebDriver driver;

       @BeforeClass
       public void setUp() throws Exception {
           System.setProperty("webdriver.chrome.driver", "YOUR CHROME DRIVER EXE PATH");
           driver = new ChromeDriver();
       }

       @BeforeMethod
       public void beforeMethod() {
           System.out.println("Before Method Setup");// for illustration
       }

       @Test
       public void testNGDemoTest() throws Exception {
           try { // Change it to production page
               int total_elements = 0;
               driver.get("https://todomvc.com/examples/react/#/");
               driver.findElement(By.className("new-todo")).sendKeys("TestNG Sample Test");
               driver.findElement(By.className("new-todo")).sendKeys(Keys.ENTER);
               total_elements = driver.findElements(By.xpath("//ul[@class='todo-list']/li//label")).size();
               Assert.assertEquals(1, total_elements);

           } catch (Exception e) {
               System.out.println(e.getMessage());
           }
       }

       @AfterMethod
       public void afterMethod() {
           System.out.println("Äfter Method");
       }

       @AfterClass
       public void tearDown() throws Exception {
           driver.quit(); // for illustration
       }

    }
Code WalkThrough
@BeforeClass and @AfterClass annotation specify that the method code will be executed before and after the class is invoked. Generally, we specify configuration methods, initialize and close driver instances, etc., in these annotations.
@BeforeMethod and @AfterMethod annotation is used to invoke the method before and after execution of each of the test methods.
@Test annotation denotes the test methods same as in JUnit.
assertEquals() method passes if the expected result matches with the actual result.
Watch this video to learn about the TestNG Annotations and how they help provide better structure and readability to the code.
How to run TestNG test cases
TestNG test cases can be run via testng.xml or through any build tool (e.g., Maven, Ant, or Gradle). testng.xml gives more flexibility for test case execution as compared to the JUnit framework.
   <?xml version="1.0" encoding="UTF-8"?>
    <!DOCTYPE suite SYSTEM "http://testng.org/testng-1.0.dtd" >
    <suite name="TestNGTestCaseDemo">
     <test name=""TestNGSeleniumDemo >
       <classes>
          <class name="Test.TestNGSeleniumDemo/>
       </classes>
     </test>
    </suite>
You can run the XML file in Eclipse or by triggering the following command from the terminal:
$ java org.testng.TestNG testing.xml
Make sure that the TestNG jar file path is set to Java ClassPath before running the tests from the command line.
If you are intrigued to learn more about the other essentials of the TestNG framework, head over to the detailed TestNG tutorial on LambdaTest learning hub.
This JUnit certification establishes testing standards for those who wish to advance their careers in Selenium automation testing with JUnit.
Here’s a short glimpse of the JUnit certification from LambdaTest:
How To Run JUnit Tests using TestNG in Selenium
Before jumping on ‘How,’ let us first understand ‘why’ we need to run test cases using JUnit and TestNG in Selenium test automation. Here is the simplest answer to the above question ‘Provision of extensive capabilities of TestNG over JUnit.’ TestNG was released much later than JUnit but offers numerous features like improved manageable test execution capabilities, better annotations to provide flexibility, and more.
Here is a brief rundown of the TestNG vs JUnit comparison:
1- Annotations: TestNG offers more annotations to make automation test case management more flexible when compared to JUnit. Although JUnit 5 has introduced a few new annotations to achieve more flexibility in test case management, we still need to see how it performs compared to JUnit.
2- Grouping of Test Cases: TestNG supports the grouping of test cases if you wish to run only a set of test cases. This can be achieved with the help of groups parameters in @Test annotation. The same tag is specified in testng.xml with the name of the groups you wish to run.
3- Parallel test case execution: TestNG supports parallel execution of test cases using multiple threads and classes using the “parallel” keyword in testng.xml
   junit.jupiter.execution.parallel.enabled = true
    junit.jupiter.execution.parallel.mode.default = concurrent
Here concurrent mode specifies parallel threads to be run for each test method. We can also set it to ‘default’ if we want a single thread for all methods. Test methods in such test classes are only executed concurrently if the @Execution(CONCURRENT) annotation is present on the test class or method. Parallel test execution in TestNG is preferred since it helps you achieve test results at a much faster pace.
4- Test case dependency: The dependsOnMethods parameter in @Test annotation is used to define the dependent method (or a group of methods). This is mostly used where one test method depends on the output of another test method(s). However, dependent tests is not a good practice when it comes to Selenium automation testing. Hence, it is recommended to follow Selenium best practices to make the most out of the test automation framework.
You can achieve dependency injection in JUnit 5, where the test methods are permitted to have parameters.
As seen until now, TestNG has many advantages over JUnit 4 (which is still in extensive use). Many of us would like to harness the capabilities of TestNG so that tests can be partially or fully migrated to TestNG. Now the question is, How do you run test cases using JUnit and TestNG in Selenium?
You might have ’N’ number of unit tests written in JUnit, which are integrated with the CI/CD pipeline. The test framework, the CI/CD pipeline, reporting, and everything are in place and running well before each release. Re-writing those test cases would lead to a significant increase in the costs. So what is the ideal solution to make the most out of JUnit, TestNG, and the corresponding CI/CD tool used in the project?
Well, TestNG solves this problem by recognizing a number of JUnit test examples through the JUnit tag in the XML file. To put it in simple words, TestNG has built-in support for running JUnit test cases. We will discuss this in detail with the same example with the help of LambdaTest’s cloud Selenium Grid.
This JUnit Tutorial for beginners and professionals will help you learn how to use JUnit framework with Selenium and Java for performing Selenium automation testing.
Parallel Test Execution of JUnit Test Cases in TestNG Using Remote Selenium Grid
Parallel testing in Selenium helps you achieve better test coverage at an expedited pace. Though parallel test execution is not a key feature of JUnit, it can be achieved using certain methods, which we further discuss in this section.
To make the execution of JUnit test cases more efficient, we can execute them in TestNG using a cloud-based remote Selenium Grid. Executing test cases using JUnit and TestNG in Selenium can be achieved in the same way as discussed earlier. However, a cloud-based Selenium Grid would ensure secure, fast, and stable test execution.
For demonstrating how to run JUnit tests using TestNG on a cloud Selenium Grid, we consider the following test scenario:
Test Scenario
Navigate to todomvc.com/examples/react/#.
Enter the text “JUnit Parallel Test sample” in the textbox.
Validate that the exact text appears in the list below the textbox.
For demonstrating the potential of parallel testing with JUnit and TestNG using Selenium cloud grid, we run the same test on multiple browser and platform combinations:
| Browser | Version | Platform |
| Chrome | 70.0 | WIN10 |
| Safari | 14.0.2 | macOS Big Sur |
| Firefox | 76.0 | WIN8 |
Let us first write the JUnit code to support the parallel execution of threads for each of the browser-platform combinations. To run a JUnit test on different browsers simultaneously, you will need to create a helper class that extends parameterized class (org.junit.runners.Parameterized) and implements RunnerScheduler class.
To demonstrate this, we are using LambdaTest cloud-based Selenium Grid that offers Selenium Automation Testing With JUnit across 2000+ browsers and operating systems.
   package Test;
    import java.util.concurrent.ExecutorService;
    import java.util.concurrent.Executors;
    import java.util.concurrent.TimeUnit;
    import org.junit.runners.Parameterized;
    import org.junit.runners.model.RunnerScheduler;
    public class Parallelized extends Parameterized {
       private static class ThreadPoolScheduler implements RunnerScheduler {
           private ExecutorService executor;
           public ThreadPoolScheduler() {
               String threads = System.getProperty("junit.parallel.threads", "15");
               int numThreads = Integer.parseInt(threads);
               executor = Executors.newFixedThreadPool(numThreads);
           }

           public void finished() {
               executor.shutdown();
               try {
                   executor.awaitTermination(10, TimeUnit.MINUTES);
               } catch (InterruptedException exc) {
                   throw new RuntimeException(exc);
               }
           }

           public void schedule(Runnable childStatement) {
               executor.submit(childStatement);
           }
       }
       public Parallelized(Class<?> klass) throws Throwable {
           super(klass);
           setScheduler(new ThreadPoolScheduler());
       }
    }
Now we will write the script to implement the above-mentioned test scenario. The Parallelized class will be passed as a parameter in @RunWith annotation. To execute the test case on LamdaTest, you have to provide our username and access key, which is available in the LambdaTest profile section.
    package Test;
    import org.openqa.selenium.By;
    import org.openqa.selenium.Platform;
    import org.openqa.selenium.WebDriver;
    import org.openqa.selenium.remote.DesiredCapabilities;
    import org.openqa.selenium.remote.RemoteWebDriver;
    import org.junit.After;
    import org.junit.Assert;
    import org.junit.Before;
    import org.junit.Test;
    import org.junit.jupiter.api.RepeatedTest;
    import org.junit.runner.RunWith;
    import org.junit.runners.Parameterized;
    import java.net.MalformedURLException;
    import java.net.URL;
    import java.util.ArrayList;
    import java.util.LinkedList;
    import java.util.List;

    [@RunWith](http://twitter.com/RunWith)(Parallelized.class)
    public class JunitParallelExecutionDemo {
       public static String username = "YOUR_USER_NAME;
       public static String accessKey = "YOUR_ACCESS_KEY";
       public String gridURL = "[@hub](http://twitter.com/hub).lambdatest.com/wd/hub";
       public String platform;
       public String browserName;
       public String browserVersion;
       public RemoteWebDriver driver = null;
       boolean status = false;

    [@Parameterized](http://twitter.com/Parameterized).Parameters
       public static LinkedList<String[]> getEnvironments() throws Exception {
           LinkedList<String[]> env = new LinkedList<String[]>();
           env.add(new String[] { "WIN10", "chrome", "70.0" });
           env.add(new String[] { "macOS Big Sur", "safari", "14.0.2" });
           env.add(new String[] { "WIN8", "firefox", "62.0" });
           return env;
       }

    public JunitParallelExecutionDemo(String platform, String browserName, String browserVersion) {
           this.platform = platform;
           this.browserName = browserName;
           this.browserVersion = browserVersion;
       }

    [@Before](http://twitter.com/Before)
       public void setUp() throws Exception {
           DesiredCapabilities capabilities = new DesiredCapabilities();
           capabilities.setCapability("browserName", browserName);
           capabilities.setCapability("version", browserVersion);
           capabilities.setCapability("platform", platform);
           capabilities.setCapability("build", "JUnitRepeatedTestSample");
           capabilities.setCapability("name", "JUnitRepeatedTestSample");
           capabilities.setCapability("network", true); // To enable network logs
           capabilities.setCapability("visual", true); // To enable step by step screenshot
           capabilities.setCapability("video", true); // To enable video recording
           capabilities.setCapability("console", true); // To capture console logs
           try {
               driver = new RemoteWebDriver(new URL("https://" + username + ":" + accessKey + gridURL), capabilities);
           } catch (MalformedURLException e) {
               System.out.println("Invalid grid URL");
           } catch (Exception e) {
               System.out.println(e.getMessage());
           }
       }
       [@Test](http://twitter.com/Test)
       [@RepeatedTest](http://twitter.com/RepeatedTest)(value=2)
       public void testParallel() throws Exception {
           try { // Change it to production page
               int total_elements=0;
               driver.get("[https://todomvc.com/examples/react/#/](https://todomvc.com/examples/react/#/)");
               driver.findElement(By.className("new-todo")).sendKeys("Lambdatest Cross Browser Testing");;
               total_elements = driver.findElements(By.xpath("//ul[[@class](http://twitter.com/class)='todo-list']/li")).size();
               Assert.assertEquals(1, total_elements);

    } catch (Exception e) {
               System.out.println(e.getMessage());
           }
       }

    [@After](http://twitter.com/After)
       public void tearDown() throws Exception {
               driver.quit();
           }

    }
Now the above test case can be run using JUnit and TestNG in Selenium, the same way as we discussed earlier. We will provide junit=”true” in the suite tag, and we are done!
    <?xml version="1.0" encoding="UTF-8"?>
    <!DOCTYPE suite SYSTEM "[http://testng.org/testng-1.0.dtd](http://testng.org/testng-1.0.dtd)" >
    <suite name = "Parallel Tests" junit="true">
     <test name="JunitParallelExecutionDemo">
       <classes>
          <class name="Test.JunitParallelExecutionDemo"/>
       </classes>
    </test>
    </suite>
As we can see from the below execution log for the above test case ran on three different browsers-platforms combination-
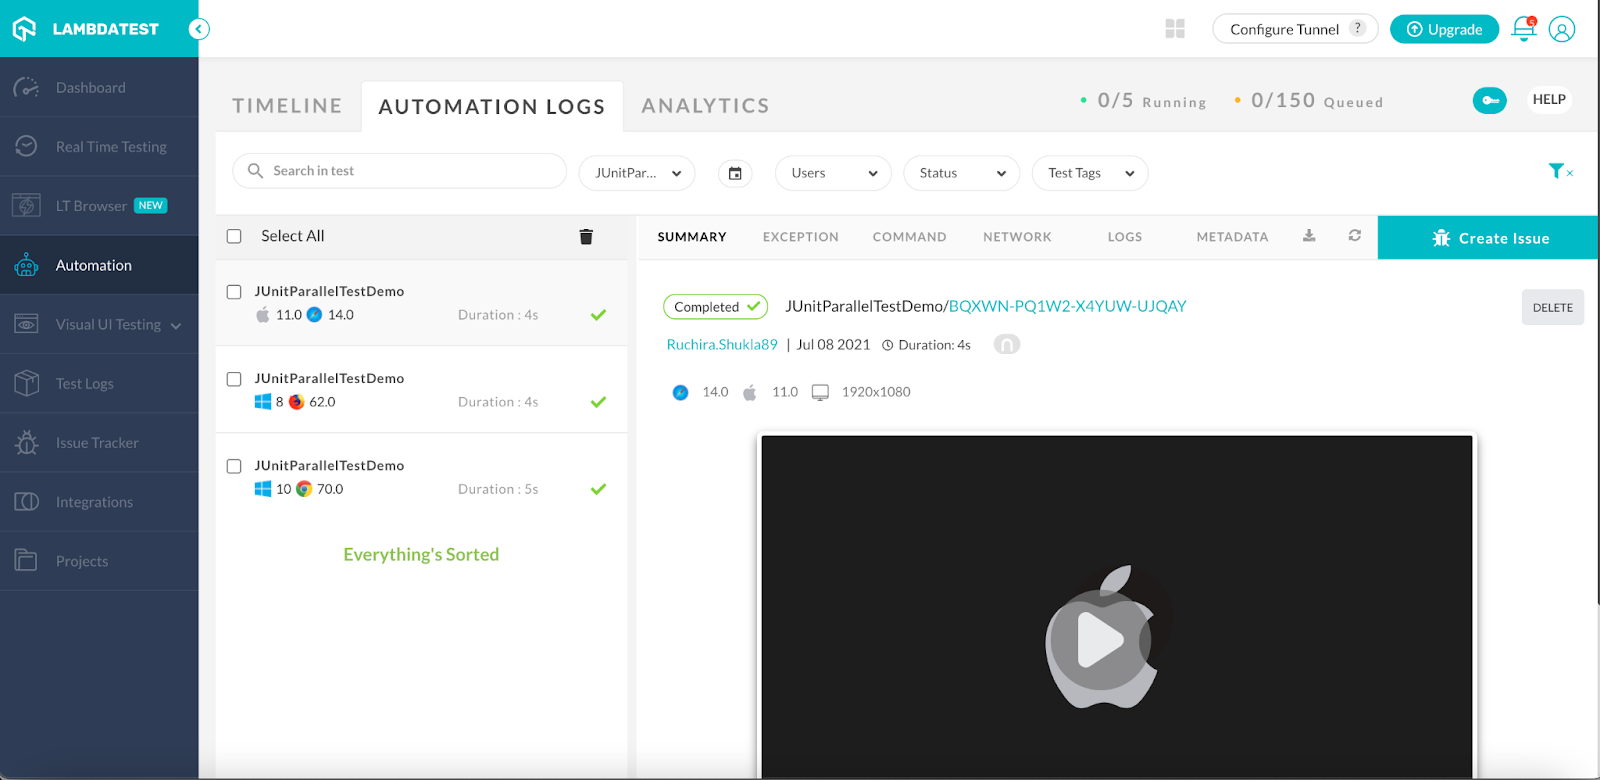
As we can see in the screenshot, the test has run on the given browsers in parallel. We can also see the execution video by selecting the particular execution and click on the video on the right side. This would help to find the issue in case there is any failure.
Hey! Are you using Playwright for automation testing? Run your Playwright test scripts instantly on 50+ browser/OS combinations using the LambdaTest cloud!
Conclusion

To summarize, we have seen the two testing frameworks -JUnit and TestNG and how they are different. Also, what are the capabilities of TestNG, and why would we need to run test cases using JUnit and TestNG in Selenium test automation. We have also explained how to do that with the help of a JUnit test example. This is how we can utilize existing test cases with the enhanced abilities of TestNG.
I hope this blog will help you run test cases using JUnit and TestNG in Selenium and find ways to scale the automation test suite using their extensive capabilities.
Happy Testing!